|
HYOSUNG BY MOTOTECK GT 650S / GT 650 ST 2005-07 GT 250 / GT 650 2005-07 MINI-TAIL
|
-
Please read these instructions from beginning to end before you start the installation. Should you have any questions, please contact Mototeck Innovation before proceeding. If you do not feel comfortable doing this job yourself, it is suggested that you have an experienced Motorcycle Technician perform the installation.
- SVP lisez ces instructions en entier avant de commencer l’installation, contacter Mototeck en cas de doutes, si vous n’êtes pas confortable a faire cette installation nous vous suggérons de faire appel a un technicien de moto expérimenté.
-
IMPORTANT NOTE: The wires for the LED Turn Signals have inline resistors. If you remove the resistors by shortening the wires, the LED's will fail upon applying electrical power. Do NOT remove these resistors. There are inline resistors for the License plate light as well.
-
NOTE IMPORTANTE: Les fils utilise pour les LED Mototeck contienne des résistance a l’intérieur de ceux-ci, SVP veillez ne pas les enlever ou il y aura défaut de fonctionnement, ne pas raccourcir les fils
- If possible, place the bike on a swing arm stand.
- Placer la moto sur une béquille de service stable.
- Remove the front seat and rear seat.
- Retirer le banc avant et arrière.
- Remove all the screws and tabs that hold the rear cowl (tail section).
- Retirer tout les boulons et vis qui retienne la partie arrière de la moto.
- Remove the rear fender that hold the turn signals, remove the brake light.
- Retirer la section plastique arrière de la moto.
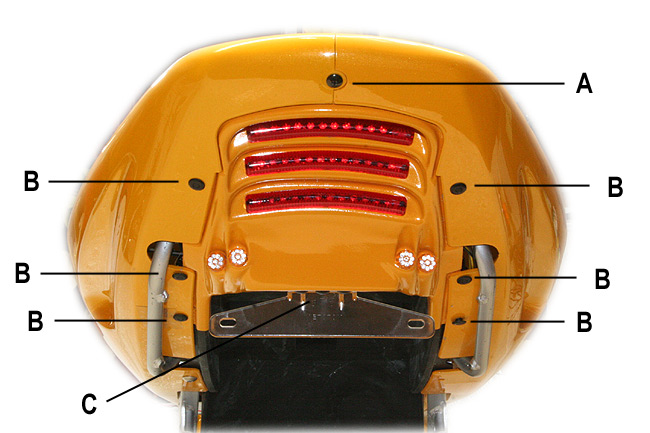
- Remove the “C” type nut from the location shown by letter A in the picture below and install it on the tab of the mini undertail, align the hole of the nut with the one on the mini undertail.
- Enlevez le boulon en forme de “C” de la partie d’origine montré en A sur la photo dessous et installer le sur le mini passage de roue en alignant les orifices.
- Insert the mini undertail at the location shown in the picture below, secure the tail section with the mini undertail with one Phillips screw going in the “C” type nut, do not over tight.
- Insérer le mini passage de roue comme montré sur la photo dessous et installer le boulon Phillips montré en A sur la photo.
- With a felt marker mark the 6 locations shown with a “B” in the picture below to prepare for drilling, once precisely marked, remove the mini undertail and drill 6 holes with ¼” drill bit, when done re-install on the tail section, screw and secure with plastic rivets.
- A l’aide d’un marqueur feutre, faites un point aux 6 endroits montrés en B pour indiquer ou vous aller percer avec une mèche de ¼ de pouces. Enlevez le mini-passage de roue avant de percer, réinstaller ensuite et sécuriser avec les rivets de plastiques.
- Also with the same drill bit, make holes to attach the license plate bracket, thru the mini-undertail and undertray (location “C” on the picture below).
- Aussi avec la même mèche, percer les trois trous montré en C sur la photo, faite cette partie avec le mini passage en place de façons a ce que la mèche percera le mini passage et la parti d’origine noire.
- Connect the LED license plate light and Turn Signal lights. All wiring connections are located on the rear of the bike. If the LED signal lights, LED brake lights and LED plate light do not illuminate, you most likely will have to reverse your wire connections on the effected lights. Do not cut the LED wires to shorten them.
- Faites les connections du LED de plaque d’immatriculation, tout les branchements sont situé a l’arrière de la moto près de la lumière. Si ensuite vous n’avez pas de succès et pas d’illumination alors vous avez certainement inversé les polarités. Svp ne raccourcissez pas les fils.
- It is suggested that you install a set of flasher resistors. In most cases, after installing LED's, the signals will flash at a very rapid rate. These resistors installed in place will return the Turn signal flashing rate back to normal. We have these units in stock.
- Il est suggéré d’installer un ensemble de résistances pour rétablir un rythme de clignotement normal, nous avons ces produits en inventaire.
- Re-assemble the remaining parts in reverse order of removal. Make sure all electrical connections are insulated and in no contacts, secure from short circuit. Check all fasteners for tightness and security enjoy.
- Réassembler la moto dans l’ordre inverse en s’assurant de sécuriser toutes les vis et boulons sans trop serrer, et protéger les branchements électriques contre les courts circuit, lorsque tout est secure, profiter !
© Copyright 2008-09 Rack in motion